MongoDB has become a go-to choice for developers building modern applications since its launch back in 2009. As a flexible, document-oriented NoSQL database, it stores data in JSON-like formats, making it ideal for handling unstructured or semi-structured data in everything from web apps to big data projects. Unlike traditional relational databases, MongoDB scales horizontally with ease, which is why it’s popular for high-traffic sites and real-time analytics. If you’re looking to deploy it on a reliable cloud platform, DigitalOcean offers straightforward options through its virtual private servers (known as Droplets) or managed database services. This guide will walk you through the process step by step, whether you prefer a hands-off managed approach or full control with a manual setup. Just keep in mind that you’ll need an active DigitalOcean account to get started—sign up if you haven’t already, as it’s quick and gives you access to their intuitive control panel.
We’ll focus on using the latest versions available as of late 2025: MongoDB 8.2 for manual installs and whatever the managed service supports (currently up to 8.0 with updates rolling out). I’ll cover prerequisites, setup, basic configuration, security, and some best practices to ensure your deployment is solid. If you’re new to this, start with the managed option—it’s simpler and handles a lot of the heavy lifting.
Option 1: Using DigitalOcean’s Managed MongoDB (Recommended for most users)
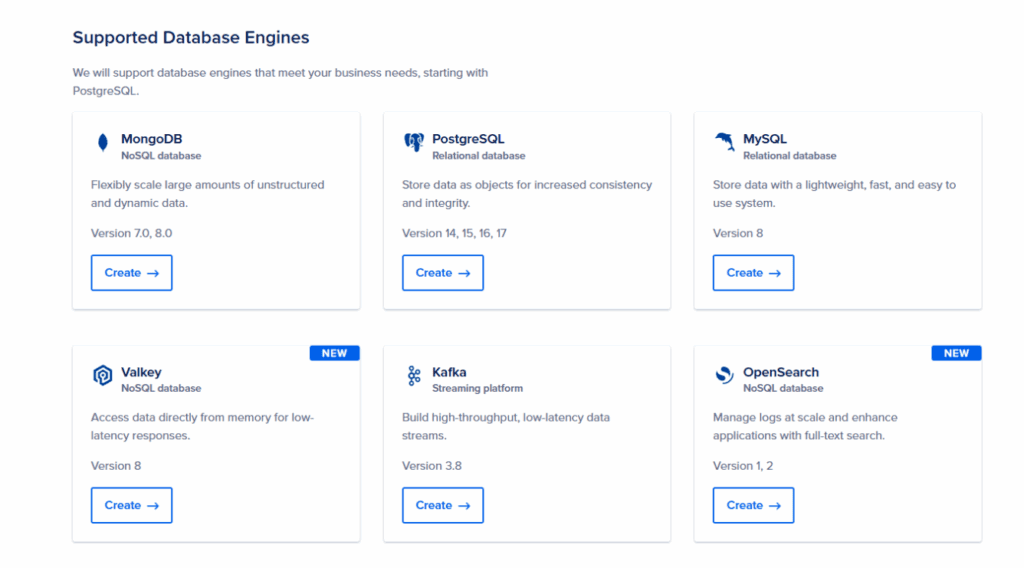
DigitalOcean’s managed databases take care of provisioning, scaling, backups, and updates, so you can focus on your app instead of server maintenance. This is especially useful if you’re not comfortable managing infrastructure or want high availability without extra effort. Expect costs starting around $15/month for a basic cluster, scaling up based on size.
Step 1: Create the Database Cluster
Log into your DigitalOcean control panel and navigate to the “Databases” section. Click “Create” and select “MongoDB” as the engine. Choose your datacenter region—pick one close to your users for lower latency. For cluster configuration, start with a basic setup: a single node for development or small apps, or add standby nodes for production (this enables automatic failover).
Select a node size based on your needs—e.g., 1 GB RAM/1 vCPU for testing, or larger for heavier loads. Enable automated backups (daily or weekly) and set a maintenance window for updates during off-hours. Finally, name your cluster and hit “Create Database Cluster.” It might take a few minutes to provision.
Step 2: Configure Connection and Security
Once the cluster is ready, grab the connection details from the control panel—they’ll include a connection string like mongodb+srv://doadmin:yourpassword@db-mongodb-nyc1-12345.mongo.ondigitalocean.com/admin?authSource=admin&replicaSet=db-mongodb-nyc1-12345.
For security, add trusted sources: restrict incoming connections to specific IP addresses (like your app server’s IP) or VPC networks if you’re using DigitalOcean’s private networking. Avoid exposing the database publicly.
To manage users and databases, head to the “Users & Databases” tab. The default doadmin user has full access; create additional users with limited roles for better security. For example, add a read-write user for your app. Use the mongo shell or a tool like MongoDB Compass to connect and test: install the mongo shell locally, then run something like mongosh "mongodb+srv://doadmin:yourpassword@your-cluster-host/admin".
Step 3: Import Data and Set Up Alerts
If you have existing data, use mongodump and mongorestore to import collections. For monitoring, enable alerts in the control panel for metrics like CPU usage, disk space, or connection counts—set thresholds to notify you via email or Slack. This helps catch issues early.
Step 4: Scale and Maintain
As your app grows, resize the cluster vertically (more RAM/CPU) or add nodes for horizontal scaling. DigitalOcean handles replicas automatically in multi-node setups. Schedule software updates during your maintenance window to keep things on the latest stable version. For logs, forward them to an external service like Elasticsearch for analysis.
This managed approach ensures 99.99% uptime and automatic failover, making it a solid choice for production without the hassle of manual config.
Option 2: Manual Setup on a DigitalOcean Droplet
If you need more customization or want to avoid managed service fees, install MongoDB directly on a Droplet. This gives you full control but requires handling updates, backups, and scaling yourself. We’ll use Ubuntu 24.04 LTS, the latest stable release, on a basic Droplet.
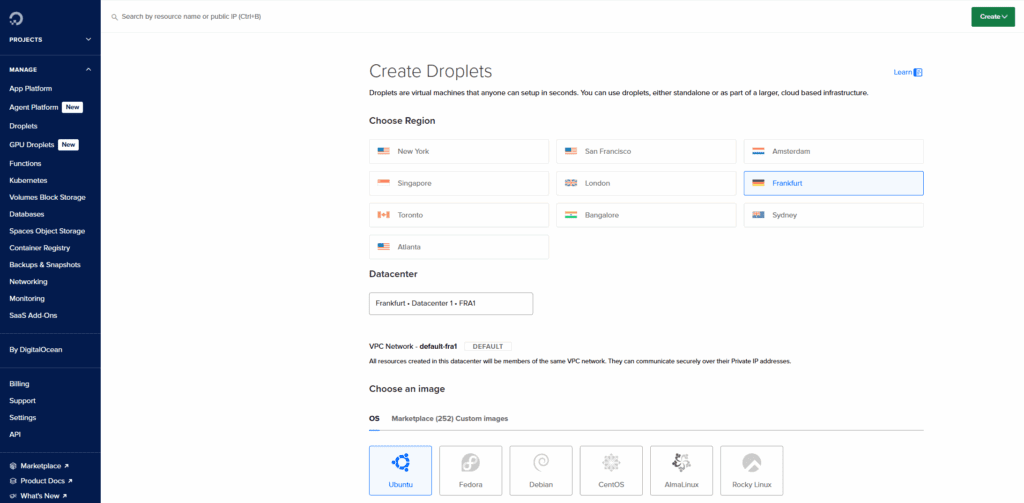
Step 1: Create and Set Up Your Droplet
In the DigitalOcean control panel, click “Create” > “Droplets.” Select Ubuntu 24.04 x64 as the image. Choose a region, then pick a size—start with at least 2 GB RAM/1 vCPU for MongoDB to run smoothly. For authentication, use SSH keys for security (upload your public key). Add tags if you like, then create the Droplet. Note the public IP once it’s ready.
SSH into your new server as root: ssh root@your-droplet-ip. First, create a non-root sudo user for safety:
sudo adduser yourusername
sudo usermod -aG sudo yourusernameExit and SSH back in as yourusername@your-droplet-ip. Set up a basic firewall with UFW:
sudo ufw allow OpenSSH
sudo ufw enableUpdate your system:
sudo apt update && sudo apt upgrade -yStep 2: Install MongoDB
MongoDB 8.2 is the latest, and it’s supported on Ubuntu 24.04 (codename “noble”). Start by importing the public key:
curl -fsSL https://www.mongodb.org/static/pgp/server-8.0.asc | sudo gpg -o /usr/share/keyrings/mongodb-server-8.0.gpg --dearmorCreate the repository list file:
echo "deb [ arch=amd64,arm64 signed-by=/usr/share/keyrings/mongodb-server-8.0.gpg ] https://repo.mongodb.org/apt/ubuntu noble/mongodb-org/8.0 multiverse" | sudo tee /etc/apt/sources.list.d/mongodb-org-8.0.listUpdate packages and install:
sudo apt update
sudo apt install -y mongodb-orgThis installs the full suite: mongod, mongos, and tools.
Step 3: Start and Enable the Service
Start MongoDB:
sudo systemctl start mongodEnable it to run on boot:
sudo systemctl enable mongodCheck status:
sudo systemctl status mongodYou should see it’s active. Test by connecting locally:
mongoshRun db.version() to confirm it’s 8.2, then exit.
Step 4: Basic Configuration
Edit the config file at /etc/mongod.conf with sudo nano /etc/mongod.conf. For remote access, under net, change bindIp: 127.0.0.1 to bindIp: 0.0.0.0 (or specific IPs for security). Add ports if needed, but default is 27017.
To enable authentication (crucial for security), add under security:
security:
authorization: enabledSave and restart: sudo systemctl restart mongod.
Now, create an admin user. Connect without auth first (if you haven’t restarted yet), or temporarily disable auth. In mongosh:
use admin
db.createUser(
  {
    user: "adminuser",
    pwd: passwordPrompt(),
    roles: [{ role: "userAdminAnyDatabase", db: "admin" }, "readWriteAnyDatabase"]
  }
)Enter a strong password. Restart if needed, then connect with auth: mongosh -u adminuser -p --authenticationDatabase admin.
Step 5: Secure Your Installation
Beyond auth, secure remote access. In UFW, allow MongoDB only from trusted IPs:
sudo ufw allow from your-app-ip to any port 27017Disable root SSH logins by editing /etc/ssh/sshd_config: set PermitRootLogin no, then sudo systemctl restart ssh.
For production, set up TLS/SSL: Generate certs and add to config under net.ssl. Also, consider VPC for private networking between Droplets.
If you need high availability, configure a replica set. This requires at least three Droplets: one primary, two secondaries. On each, install MongoDB as above, then edit config to add replication: replSetName: "yourReplicaSet". Initiate from primary: rs.initiate({ _id: "yourReplicaSet", members: [{ _id: 0, host: "primary-ip:27017" }, ...] }). Use keyfile auth for internal security—generate a key with openssl rand -base64 756 > /path/to/keyfile and reference it in config.
Step 6: Best Practices and Maintenance
Monitor performance with tools like mongotop or integrate Prometheus. Back up regularly using mongodump --uri "mongodb://adminuser:password@127.0.0.1:27017" --out /backup/path. For scaling, use sharding if data grows large—add mongos routers on separate Droplets.
Optimize by indexing frequently queried fields: in mongosh, db.collection.createIndex({ field: 1 }). Avoid over-provisioning; start small and resize your Droplet as needed via the control panel.
Test your setup thoroughly—insert data, query it, and simulate failures. If issues arise, check logs at /var/log/mongodb/mongod.log.
By following these steps, you’ll have a robust MongoDB deployment on DigitalOcean. If you referenced the managed option earlier, it’s often worth switching there for long-term ease, but manual gives you flexibility. Let me know in the comments if you run into snags!