Next.js began as a thin layer over React for server-rendered pages and static exports. Over the last few years it grew into a batteries-included framework: the App Router unified routing, layouts, data fetching, and React Server Components; Turbopack re-tooled the dev/build pipeline; and React 19 landed with improved Suspense and new server primitives.
As of 2025, Next.js 15.x is the mainstream track, with React 19 as the baseline and Turbopack powering fast local iterations. You can still reach for the Pages Router for legacy code, but new projects start with the App Router and React 19 by default.
Prerequisites you actually need:
Install a supported Node.js runtime. Next.js 15 requires Node ≥ 18.18, but for a fresh project you’ll have fewer surprises on an LTS that’s still in active support—Node 22.x qualifies today. If your organization already standardized on Node 24 “Current,” confirm library compatibility; it will transition to Active LTS later per the release schedule. Use a version manager (e.g., nvm) to avoid system-wide conflicts.
Verify your toolchain:
node -v
npm -v
git --versionIf you prefer pnpm, Yarn, or Bun, install those now; create-next-app works with all of them.
Create the project (the right way in 2025)
Use the official scaffolder and answer the prompts for TypeScript, App Router, and Tailwind (you can also pass flags if you want a non-interactive run).
npx create-next-app@latest my-app
cd my-app
npm run devOpen http://localhost:3000 and confirm the starter renders. Under the hood you’re on React 19, App Router, and a Turbopack-powered dev server, which is why hot updates feel instant.
Prefer a specific package manager? These are equivalent:
# pnpm
pnpm create next-app my-app
cd my-app && pnpm dev
# bun
bun create next-app my-app
cd my-app && bun devBun’s create next-app works; if you hit OS-specific hiccups, fall back to npx for the initialization step and use Bun for dev/build afterward.
What the scaffold gives you
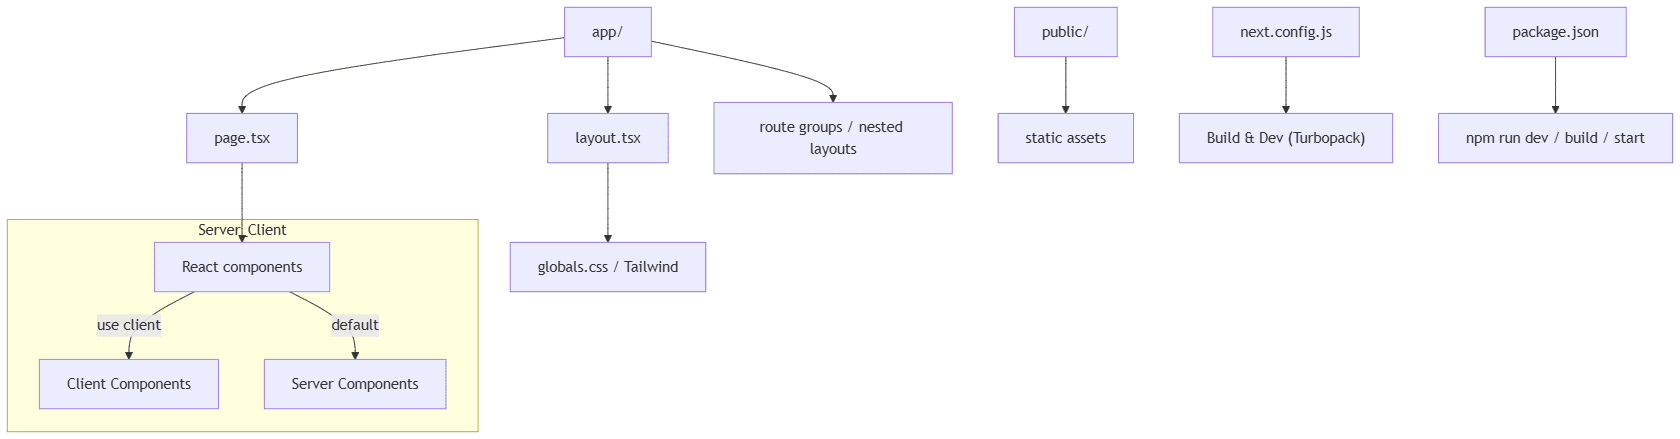
At this point your repository includes an App Router layout, a typed config, linting, and a production-grade build script. The defaults are intentionally conservative: React 19 APIs are available, Server Components are on by default in app/, and the minimum Node requirement is enforced at runtime. As of 15.5, you’ll also see improved TypeScript ergonomics and housekeeping around linting in the CLI.
Here’s the mental model for the starter:
flowchart TD
  A["app/"] --> L["layout.tsx"]
  A --> P["page.tsx"]
  A --> R["route groups / nested layouts"]
  P --> C["React components"]
  L --> G["globals.css / Tailwind"]

  subgraph Server_Client
    C -->|"use client"| UI["Client Components"]
    C -->|default| SC["Server Components"]
  end

  D["public/"] --> S["static assets"]
  CFG["next.config.js"] --> B["Build & Dev (Turbopack)"]
  PKG["package.json"] --> SCRIPTS["npm run dev / build / start"]
Add Tailwind CSS v4 (if you didn’t check the box)
If you enabled Tailwind during scaffolding, skip this step. Otherwise, Tailwind v4 installs with a single import and a PostCSS plugin. From your project root:
npm i -D tailwindcss @tailwindcss/postcss postcssCreate postcss.config.mjs:
export default {
  plugins: {
    '@tailwindcss/postcss': {},
  },
}Add Tailwind to your global stylesheet (the App Router starter uses app/globals.css):
/* app/globals.css */
@import "tailwindcss";Tailwind v4 dropped most of the boilerplate and emphasizes zero-config usage. If you need to migrate a v3 mental model or customize tokens, consult the v4 release notes and upgrade guide.
First route: a realistic pattern
Create a feature folder under app/ and start with a server component for fast page loads. If you need interactivity, isolate it in a small client component.
// app/dashboard/page.tsx (Server Component by default)
import { Suspense } from "react";
import Stats from "./stats";

export default async function DashboardPage() {
  // Example: fetch server data with built-in caching semantics
  const data = await fetch(`${process.env.API_URL}/stats`, { cache: "force-cache" }).then(r => r.json());
  return (
    <section className="space-y-6">
      <h1 className="text-2xl font-semibold">Dashboard</h1>
      <Suspense fallback={<p>Loading…</p>}>
        <Stats initial={data} />
      </Suspense>
    </section>
  );
}–>
// app/dashboard/stats.tsx
"use client";

import { useState } from "react";

export default function Stats({ initial }: { initial: any }) {
  const [expanded, setExpanded] = useState(false);
  return (
    <div className="rounded-xl border p-4">
      <pre className="text-sm">{JSON.stringify(initial, null, 2)}</pre>
      <button className="mt-4 rounded-lg border px-3 py-1" onClick={() => setExpanded(!expanded)}>
        {expanded ? "Collapse" : "Expand"}
      </button>
    </div>
  );
}React 19’s improvements to Suspense and server rendering make this split efficient without bespoke wiring.
Configuration you should keep in source control
Keep next.config.js minimal at first; the defaults are tuned for modern apps. If you opt into Turbopack for production builds during the 15.x series, do it intentionally and track release notes—Turbopack is stable in dev and steadily maturing for builds. As of 15.5, Turbopack builds are in beta with broad integration-test coverage.
For linting, rely on the framework config (eslint-config-next) and run ESLint via your package manager. Note that the next lint shim has deprecation messaging in 15.5; call ESLint directly in CI.
Local DX tips that save time:
- Use
npm run devfor the Turbopack dev server; hot refreshes are immediate. If you switched to pnpm or Bun, the scripts are the same. - Prefer environment variables over hard-coding endpoints. Next.js reads
.env.localby default and exposes variables prefixed withNEXT_PUBLIC_to the client. (See the docs’ environment variables section as you expand.)
Deploy when it still feels small
You can deploy the starter immediately—Vercel’s adapter is first-party and aligns with framework defaults. That said, any platform that supports Node 18.18+ and Next’s build output works. Start with automatic deployments from your default branch and add preview deployments for PRs. Check your Node runtime setting on the host to match local (Node 22 LTS is a good baseline today).
What to do next
From here, scaffold real features: add route groups for nested layouts, adopt server actions where form flows benefit, and integrate your design system on top of Tailwind v4. When build times matter, follow the 15.x release notes and consider enabling Turbopack builds as they harden—this page already gave you the defaults, and the release blog will tell you when to flip the switch.