MariaDB has been a go-to database for developers and sysadmins since it forked from MySQL back in 2009, mainly to keep things open-source and community-driven under the GNU GPL license. It’s essentially a drop-in replacement for MySQL but comes with extras like better query optimization, more storage engines, and stronger security features, making it ideal for everything from small apps to large-scale web services.
If you’re looking to run it on DigitalOcean, their Droplets—virtual machines in the cloud—offer a straightforward, cost-effective way to get started without dealing with hardware. In this guide, I’ll walk you through setting up and configuring the latest stable version of MariaDB (11.8 LTS as of September 2025) on a fresh Ubuntu 24.04 Droplet.
We’ll cover everything from creating your server to securing and tweaking it for real-world use. Just a quick note: to follow along, you’ll want a DigitalOcean account ready to go, as that’s how you’ll spin up the Droplet.
Before diving in, make sure you have:
- Basic comfort with the Linux command line and SSH.
- An SSH client on your local machine (like OpenSSH on Linux/Mac or PuTTY on Windows).
- A domain name if you plan to point it at your Droplet (optional but handy for production).
We’ll assume you’re starting from scratch with a new Droplet. If you already have one, you can skip to the installation steps, but double-check that it’s running Ubuntu 24.04 for compatibility.
Create Your DigitalOcean Droplet
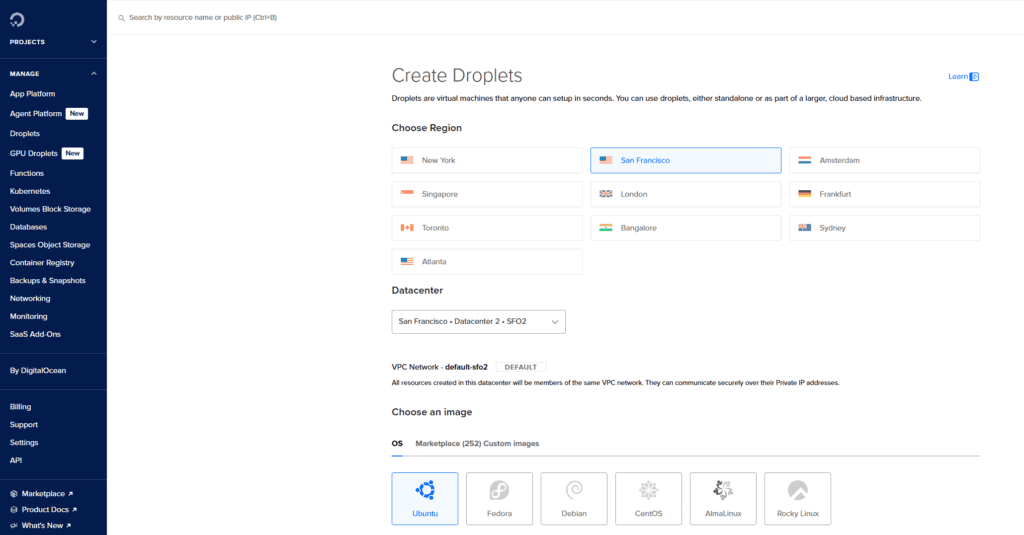
Head over to your DigitalOcean dashboard and create a new Droplet. Choose Ubuntu 24.04 LTS as the OS—it’s the latest long-term support version available there, giving you stability and security updates until 2029. For a basic MariaDB setup, a $6/month Basic Droplet with 1 GB RAM and 1 vCPU should suffice for testing or light production; scale up if you expect heavy traffic.
Select your region (pick one close to your users for lower latency), and add an SSH key for secure access—generate one if you don’t have it already with ssh-keygen on your local machine. Avoid password authentication for root to reduce security risks. Once created, note down the Droplet’s IP address; you’ll use it to SSH in.
Perform Initial Server Setup
Once your Droplet is live, connect via SSH as root:
ssh root@your_droplet_ipReplace your_droplet_ip with the actual IP. If it’s your first login, accept the host key warning.
Now, create a non-root user for everyday tasks—it’s safer than running everything as root. Let’s call the user “dbadmin”:
adduser dbadminSet a strong password and fill in any optional details. Then, grant sudo privileges:
usermod -aG sudo dbadminSwitch to this user:
su - dbadminNext, set up a basic firewall with UFW to block unwanted traffic. First, allow SSH so you don’t lock yourself out:
sudo ufw allow OpenSSHThen enable the firewall:
sudo ufw enableType ‘y’ to confirm. Check the status:
sudo ufw statusYou should see OpenSSH allowed. For now, we won’t open the MariaDB port (3306)—we’ll handle that later if you need remote access.
If you’re using SSH keys, copy them to your new user while still logged in as root (before switching):
rsync --archive --chown=dbadmin:dbadmin ~/.ssh /home/dbadminThis ensures you can SSH directly as dbadmin next time.
Update the System and Install MariaDB
With the server basics in place, update your package lists and upgrade existing packages to avoid any conflicts:
sudo apt update
sudo apt upgrade -yTo get the latest MariaDB 11.8, we’ll add the official MariaDB repository instead of using Ubuntu’s default (which might give you an older version like 10.11). Run the repository setup script:
curl -sS https://downloads.mariadb.com/MariaDB/mariadb_repo_setup | sudo bash -x -- --mariadb-server-version=11.8This configures the APT sources for MariaDB 11.8. Update the package lists again:
sudo apt updateNow install the MariaDB server and client:
sudo apt install mariadb-server mariadb-client -yMariaDB should start automatically. Verify it’s running:
sudo systemctl status mariadbYou should see it’s active. If not, start it:
sudo systemctl start mariadbEnable it to boot with the system:
sudo systemctl enable mariadbCheck the version to confirm it’s 11.8:
mariadb --versionSecure Your MariaDB Installation
Out of the box, MariaDB isn’t fully locked down, so run the security script I mentioned earlier:
sudo mysql_secure_installationThis interactive script will guide you:
- For the root password, press Enter (none is set yet).
- Say ‘N’ to unix_socket authentication if you need password-based access for tools like phpMyAdmin.
- Set a strong root password when prompted (say ‘Y’ and enter it twice).
- Remove anonymous users: ‘Y’.
- Disallow remote root login: ‘Y’ (unless you need it, but it’s risky).
- Remove the test database: ‘Y’.
- Reload privilege tables: ‘Y’.
This hardens your setup against common attacks. Note that on Ubuntu, the root user uses socket authentication by default, but setting a password overrides that for flexibility.
Basic Configuration of MariaDB
MariaDB’s main config files are in /etc/mysql/mariadb.conf.d/. The key one for server settings is 50-server.cnf. Edit it with nano (install if needed: sudo apt install nano -y):
sudo nano /etc/mysql/mariadb.conf.d/50-server.cnfAdd or tweak these under the [mysqld] section for better performance and security:
- Bind to localhost only (prevents remote access unless tunneled):
bind-address = 127.0.0.1- Set InnoDB buffer pool size (e.g., half your RAM for a 1GB Droplet):
innodb_buffer_pool_size = 512M- Enable binary logging for replication or backups:
log_bin = /var/log/mysql/mariadb-bin- Set character set to utf8mb4 for modern apps:
character-set-server = utf8mb4
collation-server = utf8mb4_general_ciSave and exit (Ctrl+O, Enter, Ctrl+X). Restart MariaDB to apply:
sudo systemctl restart mariadbIf you need remote access (not recommended for production without a VPN), change bind-address to 0.0.0.0 and open the port in UFW:
sudo ufw allow 3306/tcp
sudo ufw reloadBut stick to SSH tunneling for safety.
Create a Database and User
Test your setup by creating a sample database and user. Log in as root:
sudo mariadb -u root -pEnter your root password. Then:
CREATE DATABASE myapp_db;CREATE USER 'myapp_user'@'localhost' IDENTIFIED BY 'strong_password';
GRANT ALL PRIVILEGES ON myapp_db.* TO 'myapp_user'@'localhost';FLUSH PRIVILEGES;EXIT;This sets up a dedicated user—better than using root for apps.
Testing and Verification
Log in with your new user:
mariadb -u myapp_user -pEnter the password, then show databases:
SHOW DATABASES;You should see myapp_db. If everything works, you’re good.
For a quick performance check, run:
mariadb-admin -u root -p versionThis confirms the server is up and running with your version.
Advanced Tips and Best Practices
To keep things grounded, here’s how to go beyond basics:
- Backups: Use mariadb-dump for logical backups:
mariadb-dump -u root -p myapp_db > backup.sqlFor physical, stop the service and copy /var/lib/mysql/, or use mariabackup for hot backups.
- Monitoring: Install tools like mytop or enable slow query logging in the config:
slow_query_log = 1
slow_query_log_file = /var/log/mysql/mariadb-slow.log
long_query_time = 2- Security Extras: Disable LOCAL INFILE in the config to prevent file-based attacks:
local-infile=0Change the default port if exposed:
port = 3307And always use strong, unique passwords—consider tools like pwgen.
- Performance Tuning: Monitor with
SHOW STATUS;and adjust based on your workload. For example, increase max_connections if needed:
max_connections = 200- Updates: Regularly run
sudo apt update && sudo apt upgrade -yto patch vulnerabilities. MariaDB 11.8 gets support until mid-2030, so you’re set for a while.
If you run into issues, check logs at /var/log/mysql/error.log. This setup should handle most needs, but scale your Droplet or consider DigitalOcean’s Managed Databases for hands-off management as your app grows.