


When you plan a DNS change—such as moving your website to a new server—the biggest obstacle is cached records across the Internet. By default, recursive resolvers may hold onto old data until the record’s time to live (TTL) expires. If the TTL is high (like 24 hours), many users will still be sent to the old IP long after you update it.
The solution is simple: lower the TTL in advance so caches refresh more quickly when you flip the record. Let’s walk through the process step by step.
Check your current TTL
Use dig to see what TTL is set for a record:
dig www.dropletdrift.com A +ttlunitsThe output shows the TTL in seconds (e.g. 86400s = 24 hours).
Decide on a temporary lower TTL
A common choice is 300 seconds (5 minutes). This means any cached record will expire within 5 minutes, allowing near-real-time updates once you switch.
Update the TTL in your DNS zone
Log in to your DNS management portal or edit your zone file. Change the TTL for the record(s) you plan to update—often A, AAAA, or CNAME records for your main site.
Example zone file entry before:
www IN A 203.0.113.45After lowering TTL:
www 300 IN A 203.0.113.45Wait at least one original TTL
Resolvers that already cached the record will not notice the new, lower TTL until their current cache expires. For example, if your original TTL was 24 hours, you must wait up to 24 hours for all caches to refresh. Only then can you rely on the new short TTL being honored.
Make your DNS change
When ready, update the record to its new value (e.g. new server IP). Because the TTL is now 300 seconds, caches around the world will pick up the change within 5 minutes at most.
www 300 IN A 198.51.100.77Verify propagation
Use dig against multiple resolvers to confirm the new record is visible:
dig @8.8.8.8 www.dropletdrift.com A
dig @1.1.1.1 www.dropletdrift.com AYou should see the new IP after a few minutes.
Raise the TTL again
Once the migration is stable, raise the TTL back to a higher value (e.g. 3600 seconds or 86400 seconds). This reduces load on your authoritative nameservers and improves resolver cache efficiency.
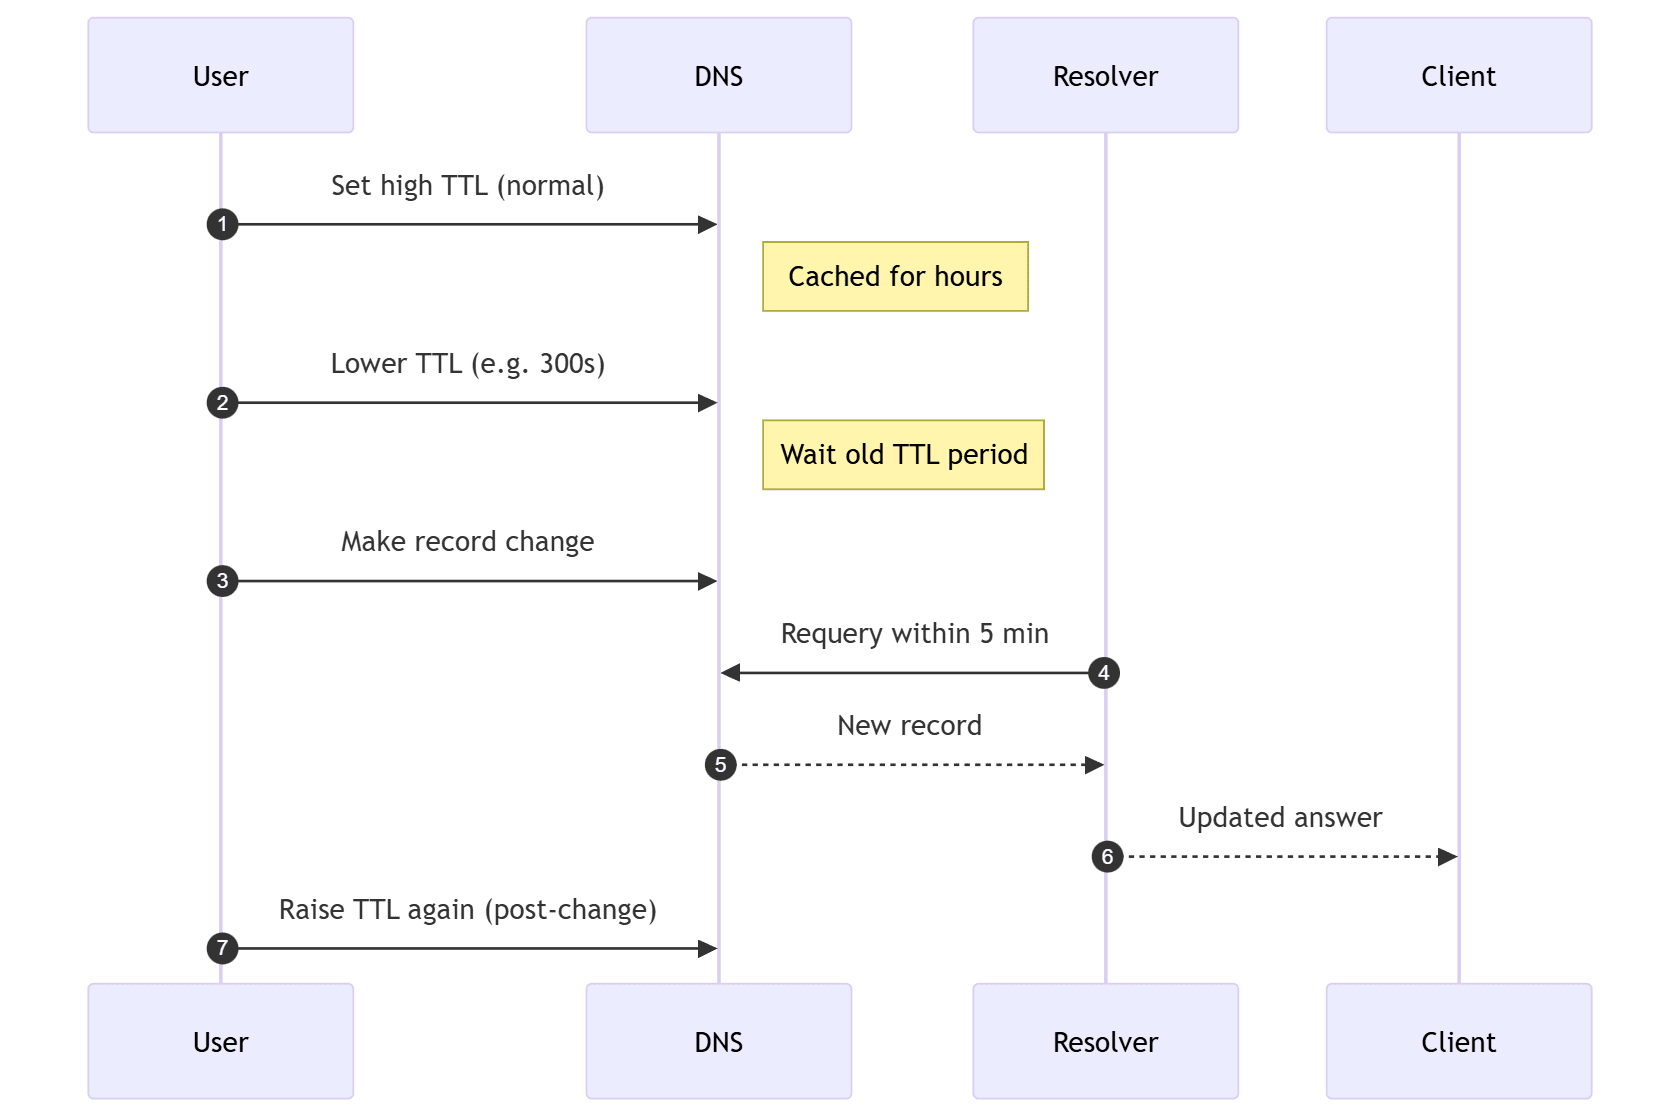
Visual summary
sequenceDiagram
  autonumber
  User->>DNS: Set high TTL (normal)
  Note right of DNS: Cached for hours
  User->>DNS: Lower TTL (e.g. 300s)
  Note right of DNS: Wait old TTL period
  User->>DNS: Make record change
  Resolver->>DNS: Requery within 5 min
  DNS-->>Resolver: New record
  Resolver-->>Client: Updated answer
  User->>DNS: Raise TTL again (post-change)
Key takeaways
- Always lower TTL at least one full TTL in advance of the planned change.
- Choose a balance: 300 seconds is flexible for cutovers, but don’t leave it that low forever.
- Verify changes using multiple resolvers, not just your local cache.
And last but not least: here’s a platform-specific TTL adjustment checklist including Cloudflare, AWS Route 53, BIND, and DigitalOcean DNS. Each shows how to lower TTL before a DNS change and then restore it afterward.
Cloudflare
- Log in to the Cloudflare dashboard.
- Select your domain → DNS tab.
- Find the record you plan to update (A, AAAA, CNAME, etc.).
- Edit the record and set TTL = 300 seconds (or “Auto” if you prefer Cloudflare’s dynamic policy, but fixed 300 is better for planned changes).
- Save the change.
- After migration, edit again to raise TTL (e.g. 3600 or 86400).
AWS Route 53
- Open the Route 53 console.
- Go to Hosted Zones → choose your domain.
- Select the record set you want to adjust.
- In the record’s settings, change TTL to
300. - Save the record set.
- Wait at least the original TTL before making your cutover.
- After the update, raise TTL back to your normal value.
BIND (zone file example)
In a BIND zone file, TTLs can be set globally or per record.
Before (high TTL):
$TTL 86400
www IN A 203.0.113.45Lower TTL for cutover:
$TTL 300
www IN A 203.0.113.45Steps:
- Edit the zone file to change
$TTLor individual record TTLs. - Increment the SOA serial number.
- Reload BIND:
sudo rndc reload - After migration, restore
$TTLto the higher value and repeat the reload.
DigitalOcean DNS
- Log in to your DigitalOcean dashboard.
- Go to Networking → Domains.
- Choose your domain.
- Locate the DNS record to be updated.
- Click Edit → change the TTL value (set to
300). - Save changes.
- As with other platforms, wait for the old TTL to expire before making the record switch.
- Once stable, return to Edit and raise TTL back to a higher value.


 developer salary in 2025")