Next.js, if you’re not super familiar, is a React framework that shines for things like server-side rendering (SSR), static site generation (SSG), and API routes. To deploy it properly, you’ll need to decide if you’re going static-only (which exports to plain HTML/CSS/JS for simple hosting) or full-featured with a Node.js server (for dynamic stuff like SSR). DigitalOcean supports both, but for the full experience, you’ll want that server setup.
DigitalOcean gives you a few solid options: their App Platform (a PaaS that’s quick and managed), Droplets (virtual machines for custom configs), or even Functions for serverless bits, though that’s more niche for Next.js apps. App Platform is often the easiest starting point if you’re not into server admin work—it handles scaling, builds, and deploys from Git. Droplets give you more flexibility, like tweaking Nginx or PM2 for process management. I’ll walk you through both main paths here, starting with App Platform since it’s less hassle for most folks. Whichever way you go, expect to spend $5–$20/month on the low end, depending on traffic.
Before we jump in, make sure you’ve got these basics covered:
- A DigitalOcean account (sign up if you don’t have one—they often have promo credits).
- A Next.js app ready to go. If you’re testing, you can use a simple one from
npx create-next-app@latest. - Git installed locally, and your app pushed to a GitHub repo (especially for App Platform).
- Node.js and npm/yarn on your local machine for building/testing.
- A domain name if you want a custom URL (optional, but we’ll touch on it).
Oh, and one quick note from Next.js docs: For deployments, your package.json should have these scripts at minimum:
{
  "scripts": {
    "dev": "next dev",
    "build": "next build",
    "start": "next start"
  }
}That lets you build with npm run build and run the server with npm run start. If you’re going static-only, add "export": "next export" for generating static files.
Option 1: Deploying on DigitalOcean App Platform
This is great if you want DigitalOcean to handle the heavy lifting—auto-builds, scaling, and even a global CDN. It’s serverless in feel but runs your full Next.js app with Node.js support for SSR and dynamic routes. No need to mess with servers yourself. From what I saw in their docs, it deploys in minutes if your app’s in GitHub.
First, if you don’t have a sample to test with, fork DigitalOcean’s own Next.js sample repo: Head to https://github.com/digitalocean/sample-nextjs and click Fork in the top right. That way, you can tweak it and enable auto-deploys. If it’s your own app, just make sure it’s in a GitHub repo.
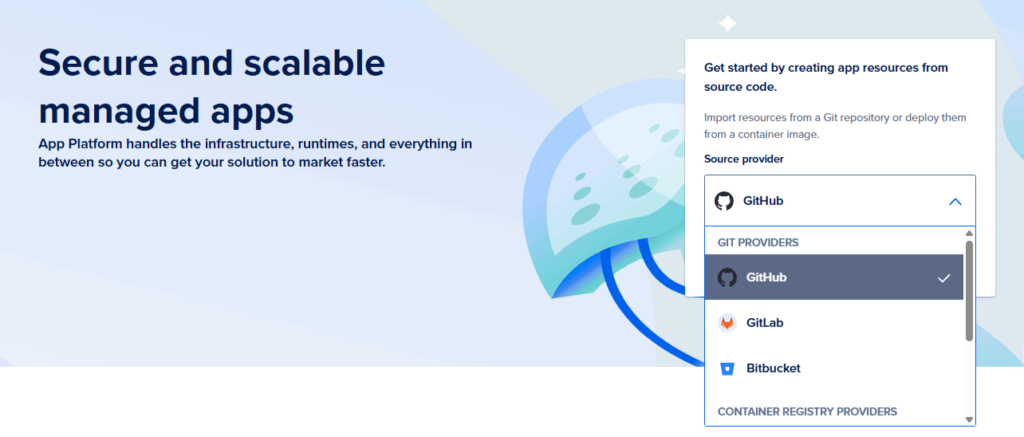
Now, log into your DigitalOcean dashboard and click “Create” > “Apps” to start a new app.
- Under “Source Provider,” pick GitHub and authorize if needed.
- Select your repo (like the forked sample-nextjs) and branch (usually main).
- Make sure “Autodeploy” is checked so it rebuilds on pushes.
- Click Next. Here, you can add env variables if your app needs them (e.g., API keys), set up a database if it’s connected, or define HTTP routes. For a basic Next.js app, the defaults often work fine—it’ll detect the Node.js buildpack automatically.
- Name your app something memorable, pick a region close to your users (DO picks the nearest by default, which is smart for latency).
- Review the plan—start with the Basic tier if it’s low-traffic; it scales up as needed.
- Hit “Launch App.” You’ll see a “Building…” status; click “View Logs” to watch the progress. It might take 2–5 minutes.
Once it’s done, grab the “Live App” link from the dashboard. Boom, your app’s up at a .ondigitalocean.app subdomain. If you want a custom domain, go to the app’s Settings > Domains, add your domain, and update your DNS with an A record pointing to the app’s load balancer IP (DO provides it).
If you forked the repo earlier, test changes: Edit something like the homepage in pages/index.js (or app/page.js if using the App Router), commit to main, and watch the app auto-redeploy. Refresh the live site, and your updates should show. Handy for CI/CD without extra setup.
One tip: App Platform supports both npm and Yarn, but commit your lock file (package-lock.json or yarn.lock) to the repo. If your app uses static exports only, it’ll optimize for that, but for SSR, it runs the full server. Costs start low, but monitor usage in the dashboard to avoid surprises.
If things go south—like build errors—check logs for clues, often it’s missing deps or env vars. And when you’re done testing, don’t forget to destroy the app in Settings to stop billing.
Option 2: Deploying on a DigitalOcean Droplet
If App Platform feels too hands-off and you want to manage your own server—like for custom caching, multiple services, or just because you prefer it—go with a Droplet. This is basically a Ubuntu VM where you’ll install Node, build your app, and use tools like Nginx for reverse proxy and PM2 to keep it running. It’s more involved, but gives you full access. Expect to SSH in and run commands; if you’re new to servers, it might take an hour or two.
Start by creating a Droplet: In your DO dashboard, click “Create” > “Droplets.”
- Pick Ubuntu (latest LTS, like 22.04 or 24.04).
- Choose a plan—start with a $6/month Basic one (1GB RAM) for light use; scale up if needed.
- Select a region close to your audience.
- Add an SSH key for secure login (generate one with
ssh-keygenif you don’t have it). - Set a hostname, maybe your domain or “nextjs-app.”
- Create it, and note the IP address.
Now, SSH in: ssh root@your-droplet-ip. If it’s your first time, accept the fingerprint.
Update the system right away:
sudo apt update && sudo apt upgrade -yInstall essentials:
sudo apt install -y nodejs npm nginxFor your app: I like putting it in /var/www/. If you’re cloning from Git, install Git first (sudo apt install git), then:
cd /var/www
git clone your-repo-url nextjs-app
cd nextjs-app
npm install(Or if starting fresh, npx create-next-app@latest . inside the dir.)
Build it:
npm run buildTest locally with npm start—it should run on port 3000. Ctrl+C to stop.
To keep it running reliably, install PM2:
sudo npm install -g pm2
pm2 start npm --name "nextjs" -- start
pm2 startup  # Follow the output to enable on boot
pm2 saveNow, set up Nginx as a reverse proxy so it serves on port 80/443. Create a config file:
sudo nano /etc/nginx/sites-available/nextjsPaste this (replace your-domain-or-ip with your actual domain or IP):
server {
  listen 80;
  server_name your-domain-or-ip;

  location / {
    proxy_pass http://localhost:3000;
    proxy_http_version 1.1;
    proxy_set_header Upgrade $http_upgrade;
    proxy_set_header Connection 'upgrade';
    proxy_set_header Host $host;
    proxy_cache_bypass $http_upgrade;
  }
}Save, then link and test:
sudo ln -s /etc/nginx/sites-available/nextjs /etc/nginx/sites-enabled/
sudo nginx -t
sudo systemctl restart nginxYour app should now be live at http://your-droplet-ip. If using a domain, point its A record to the IP in your DNS provider.
For security, add SSL with Let’s Encrypt: Install certbot (sudo apt install certbot python3-certbot-nginx), run sudo certbot --nginx, and follow prompts. It’ll update your Nginx config for HTTPS.
Tips here: Monitor with pm2 logs or pm2 monit. For production, add a firewall (ufw allow OpenSSH, ufw allow 'Nginx Full', ufw enable). If traffic grows, scale by upgrading the Droplet or adding load balancers. And remember, unlike App Platform, you’re on the hook for updates and security patches.
Wrapping up.. best practices and next steps
Whichever option you picked earlier—App Platform for speed or Droplet for tweaks—test thoroughly: Check SSR pages load dynamically, static ones are fast, and errors are handled. Set up monitoring in DO’s dashboard for alerts on downtime or high usage.
For scaling, App Platform auto-handles it; on Droplets, you might add CI/CD with GitHub Actions to automate deploys (push to main, build, rsync to server). Environment variables are key for secrets—don’t hardcode them. And if you’re going static-only, export with next export and host the output dir via Nginx or even DO Spaces (their S3-like storage).
If your app has a database, DO’s Managed Databases integrate easily with either method. Costs can creep up with traffic, so start small. If something breaks, DO’s community forums are gold for troubleshooting.
There you have it—a solid path to get your Next.js app running on DigitalOcean. If you hit snags, double-check the steps or their docs. Let me know if you need tweaks for a specific setup!